
_edited_edited.jpg)
Jen's Love For Wallpaper! Take A Stroll Through Her House & RV :) PLUS Some Tips on Peel & Stick Wallpaper!
- Jen Galvin-Anderson

- Jun 19, 2025
- 5 min read
For as long as I can remember, I have had a love and passion for both color and geometric shapes when it comes to any type of interior decorating!
And take a wild guess where you can combine those 2 loves (wink wink)...!
Sooooo lets just say Wallpaper is a hardcore LOVE AFFAIR FOR ME where creative energy in both color and design can be combined and used to create what I consider a piece of art for any room! If I had my way and it wasn’t a bit obsessive and overboard, I would put wallpaper in every room – No joke!!!
But I know I know… balance (sigh). Dang it!
The addition of my RV Renovation these past couple of years has also brought more opportunity to incorporate a good old artistic print!
So I thought I would use this space to show you guys in one spot the various ways I have used wallpaper and peel & stick.... so far!
Cause yes, it can be used in more ways than just a basic wall!
ALSO WHY I LOVE IT! GET CREATIVE WITH IT!!!!!
I absolutely LOVE how easily it adds creative energy and can shift any space or object! I hope these photos inspire you to get creative with it and look at Wallpaper Prints as a piece of art the next time you’re playing with the idea of changing up a room in some way!
Plus scroll down for a little tutorial on Peel & Stick and the lessons I learned from working with it annndddd yes also a bit of a vent session from me on all things Peel & Stick Wallpaper with any pattern, especially shapes!
If you are someone who has tackled this type of project as well in any capacity –
GROUP HUG AND MAJOR PAT ON THE BACK FROM ME!!!! SERIOUSLY!!!!! I HOPE YOU GIFTED YOURSELF SOME SORT OF REWARD AFTER MASTERING IT CAUSE I ALMOST LOST MY MIND! NO JOKE! :)
Hope you enjoy the Inspo & keep reading for the tips below!


Dining Room


Downstairs Bathroom My Bedroom

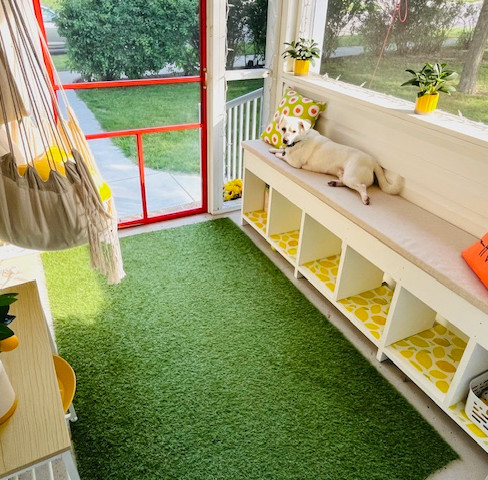


My Back Screen Porch
I cut some heavy-duty plastic to match the size of the cubbies and wallpapered the plastic pieces so they are removeable.


Wallpaper in Bookcase & Framed Wallpaper
I saw in one of my magazines the idea to put Wallpaper Print in the back of a bookcase and knew that my living room would be the perfect spot for this! I found this Wallpaper Print scrolling online and FELL IN LOVE WITH IT and how it turned out - so much so that I decided to frame some for my wall! Wallpaper is art!
Drum Roll Please.....
Now Onto Peel & Stick in the RV!
Confession time - Peel & Stick has been something I have been avoiding since I began my RV Reno 3 years ago. I was completely intimidated by it, especially since I have my LOVE AFFAIR with all things PATTERNS!
Yah, go figure! Not easy!
I actually refused to even attempt it last year when we put it up for the first time in the RV bathroom. I called in my Mom to help me cause I was completely intimidated by even the thought of it. I did put peel & stick in some open cabinets 2 years ago - (also NOT EASY!), but this was a room and it was a pattern to match up, so I didn't even want to attempt it and knew my mom had experience with it, especially after she helped me with my dining room wallpaper 2 years ago. She was nice enough to help me again with the RV and did an awesome job!
But then winter happened and freezing temps can shift things a bit in an RV, and me being a perfectionist Virgo and only because this RV Reno is being done with the intent of this RV being sold to someone, I knew this Spring that there was one wall I wanted to re-do, so the opportunity to face my FEAR appeared!
I took my time watching YouTube videos and reading posts from others in the Facebook RV Reno Groups I'm in, and finally the time came for me to face it and tackle it! There were swear words and sweat, but I did it!!!!!! And it turned out pretty dang good! I am happy with it! And learned A LOT! Here is what I wrote down to pass on for tips for anyone else wanting to attempt this or something similar for an RV space -
Tips and thoughts on it -
*DO NOT USE ANY SPRAY ADHESIVE! Not NECESSARY and only makes it way worse and much more difficult.
*Apply it and work with it in SMALL chunks at a time of peeling the backing off and just use your hands/arm/towel to smooth it out. You have the ability to shift it and it is able to peel off and back on again without issue if you need to move the alignment a bit.
*Use a sharp razor blade tool and a straight edge to trim around edges.
*ORDER DOUBLE the amount of paper you think you will need! TRUST ME!
*It's easier to start from the bottom and work your way up.
*GO SLOW! DO NOT RUSH!
*The seams tend to merge and blend in well - so don't panic a ton about getting it perfectly aligned - once you get it up and smoothed in the edging lines merge into the design and wall in the big picture of it.
*Cut as you go up the wall around any frames or outlets etc. - don't try to pre cut! You end up wasting way more paper than need be.
If you HAVE to then MEASURE and CUT OUT – for example, if you have to go around something that you can’t take off the wall! Like a literal stencil cut-out!
Hope this helps! Have Fun & Do NOT be intimidated by it! I promise it's worth it in the end!!!!
Also if you want to see the before photos of my RV which is a 1980 Mallard, visit My Renovations tab on this page.
Continue to Love well, Live well & keep surrendering to the zest of life ... ;)
~ Jen
MY RV WALLPAPER

I also gave up on Peel & Stick backsplash, so in my research I discovered Paintable Wallpaper! You can search different patterns/textures and it can be painted any color you wish! I rolled the wallpaper the wide way so there is only one seam in the backsplash and with multiple coats of White Paint, you can barely even see the seam and it looks WAY BETTER THAN THE PEEL & STICK tiles that looked like a sticker you could peel right off! Very happy with this option and how it looks!
(The countertop is in the process of being re-done, so please ignore that. I also gave up on Peel & Stick Countertop Contact Paper. Stay tuned for a future Blog post on that! wink wink)


BATHROOM BEFORE AND AFTER!!!!!! CAN YOU BELIEVE IT?!?!?!?
AND NO IT WAS NOT EASY!
BUT WORTH EVERY BLOOD, SWEAT, TEARS & SWEAR WORDS!!!


Thanks for checking out my love and passion for all things
wallpaper and renovating spaces!!!!!


Comments